
Friday, December 26, 2014
Lovely As A Tree
Monday, December 15, 2014
Blue Bird

A Little Bird Told Me

Tuesday, November 11, 2014
BE JOYFUL IN YOUR FAITH!
 This card brought lots of joy to me as it was made during fun time spent with my friend Debbie A. She is such a great friend and inspires me to continue to walk in my faith daily buy sharing faith pod cast, cds, books and mostly her heart and Love of the Lord! She blesses me with her gifts of hard work and helping me to redo my stamp studio and it is looking great! As I have said before God places people in our lives that we need and she has definitely been one of those gifts! I know that we often have days and even weeks, or months that seem like we have terrible things happening and it weights us down. You can feel like your walking in mud, and your shoes are sinking in like quick sand. Things become so negative and overwhelming, that you need some one strong to pull you out of harms way! This is when you put on your "Faith ARMOR" Gods armor, (Ephesians 6: 1-12) Put on the whole armor of God, that ye may be able to stand against the wiles of the devil.) The shield of faith is so powerful and when you wear it every day, others around you will even ask, what is going on with you today? You look so beautiful, happy and all together! I have not spent big bucks at the salon or gone shopping for new clothes, I have spent time BEING JOYFUL IN MY FAITH! That joy is so strong it attacks the senses! Others will see, taste and smell and be open to hearing it as well! Share your faith tell others of Gods armor,and that they can trust, his strength will get us all through the terrible times and his joy and glory will lift your spirits beyond belief! I so enjoy making cards and sending them to my friends and family. This card was embossed with pewter powder and then I hand cut it and placed it on a border punched designer paper. I made a pretty red one too and will post it soon. I have beautiful card supplies and will be happy to order for you! debsegler@gmail.com Be Blessed my friends!
 Friday, November 7, 2014
He painted nature for us!

Wednesday, October 29, 2014
FOUR SQUARE: I KNOW YOU PLAYED IT IN ELEMENTARY SCHOOL!

Sunday, October 12, 2014
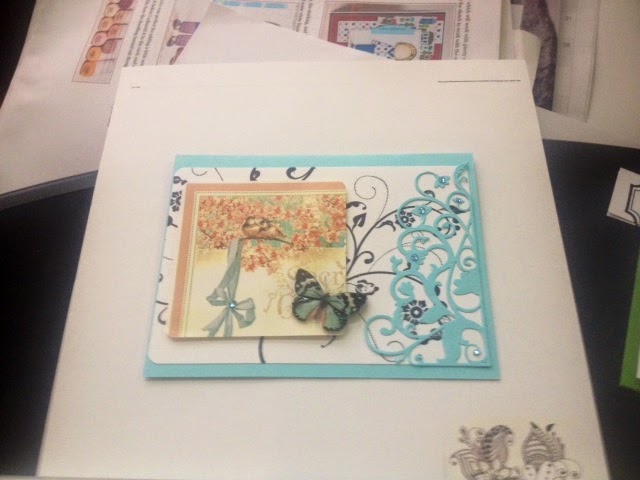
Curvy Cut for Cards!
 I like to make cards that are different shapes and folds. This card is made using a little trick to get your curvy shape at the card opening. My sweet stamp friend Debbie A, designed this card at our last play day. She used her curvy die cut that was a metal thin die. First fold your card and then place a die cut on the edge of your flap. Be creative and use some of those dies you have not played with in ages. When you cut the flap, then cut a bright color here we used the red, to glue right over the first cut you made on the white card base. This card is a shinny white paper, with christmas flowers and leaves added to the flap. Then on the left side we added a red strip with a silver ribbon trim. We added silver stickles to the edges of our flowers and it gave the card a focal point that draws your eye. Hope you enjoy this design and will send me a picture of your Curvy shapes!
 Thursday, October 9, 2014
Follow the Stars!

Thursday, October 2, 2014
LET IT SNOW!!!

Betty and Lorna. This is Betty's design and I sure enjoyed the fun and fellowship as it serves as my therapy for the week! This card is all die cuts and it was a blast to make, as we had an assembly line, Lorna cut, and I glues! (The easy part) I added stickles to give the trees and snow and clouds some POP! You could make this card by using stamps and cutting them out. The tear the paper technique makes pretty snow and clouds so get to designing your own winter scene! debsegler@gmail.com sales on lots of goodies!
Wednesday, October 1, 2014
Special Retreat Carsd

Wednesday, September 24, 2014
Let It Snow!

Monday, August 18, 2014
Privacy Screen Card

This card is right up my alley for making different folds and designs. The card is 11 by six inches. And you score at 2 and 3/4, 5 and 1/2 , then 8 and 1/4 inches. The inside decorative panels are 4 and 5/8, by 2 and 3/8 inches. The very best part of all is the way you get the legs to look so cute! It is the decorative label punch # 120907, 16.95 from stampin up. You simply center the punch in the middle of each panel, but you only put the card stock in up to the half mark of the punch. This punch has a small point on each side of the longest side ( diamond shape or more than less than sign) and this is where you stop the paper so when you cut there is open space you can see through when you punch.
( you tube video) My stamp friend Betty used her Christmas ornament punch for the legs and they really looked pretty too! So get creative with it my friends. Please email me with your order you need this punch now! debsegler@gmail.com
( you tube video) My stamp friend Betty used her Christmas ornament punch for the legs and they really looked pretty too! So get creative with it my friends. Please email me with your order you need this punch now! debsegler@gmail.com
Tuesday, August 5, 2014
FERN Sympathy
 This card was made by my stamp friend Lorna . This is a quick card with a clean look. Stamp your brown elements on craft paper. Next stamp your fern, leaves or floral design in a dark green. Stamp off on a scrap before stamping onto the white cut out sentiment. Line your sentiment lighter colored ferns up with the dark green ones. This gives your card another level of color and focus. The craft card with stamped designs are then mounted onto a white card stock, and green card base.
 Friday, August 1, 2014
New Flower Punch

Monday, July 21, 2014

Tuesday, July 15, 2014
Guest Designer Debbie A. Copics Coloring!

Butterfly Napkin Card

Stamp Friends Flock Together!

Tuesday, July 8, 2014
Paper Napkin Background! Make your own!

Happy Summer Birthday

Friday, June 27, 2014
A ROSE BY ANY OTHER NAME ...

Flowers just make me smile and this rose embossing folder can add so much to your project. I know it is difficult to see but, across the top of the rose I have cut out the design and then stamped my sentiment in the corner under my cut out. I used chalks to color the roses with and then added the bling in the middle. It is very simple yet elegant card! I hope your day is very blessed and take some time today to renew your faith and lift your spirits by giving someone a beautiful card you have made yourself!
BUNCH OF FUN

Monday, June 23, 2014
A Feather and Flower

Splish Splash!

Sunday, June 22, 2014
BUTTERFLY, BIRDS, AND BACKGROUNDS!
Rose with a twist!

Thanks A LATT E!

Friday, June 6, 2014
Zentangel Design Card
 I think the Zentangle doodling look is so cool! This card is a stamp and it makes the coloring extra fun for me. Coloring is one of my best forms of therapy and I really love getting to choose all of the fun colors! I hear you saying, I don't have a stamp like this but you really do! Take a stamp with some larger empty spaces and use smaller stamps to fill in some designs or use a black pen and design your own! Send me your samples so I can post them! debsegler@gmail.com
 Tuesday, June 3, 2014
Simply SAID AND MADE!~

Thursday, May 29, 2014
Summer Time Flowers
 This card has a white base card that is difficult to see but, that is how the rectangle flower on the dark blue mat is able to hang off to the side. The dark green base is about two inches smaller in width, then the dark blue base is an inch and half smaller than the green base and you center it over the green. I placed a larger blue mat under the long flower and it hangs over onto the white of the card base. The blue butterfly with some bling on it adds a little POP as does the light blue ribbon. Have a blessed rest of the week and get your stamp on!
 Wednesday, May 21, 2014
PILLOW TOP BACKGROUND CARD


 This design is taken from a card I saw on another blog. I love to to make different types of technique cards so I had to try this one too! I used a clear sheet of firm acrylic. I had to cut the front out of a product bag holding die cuts. The second picture with the black dot helps you to see the clear acrylic. My piece was a little short, and I had to move it down each time so it would reach from corner to corner. I taped my white background card stock to the mat with tape runner on the back, so it would not slide during daubing on of color. You angle the clear sheet from corner to corner, and top to bottom, diagonally. Use your colored ink pad and a dauber, then smudge ink up in a straight line off the edge of the clear acrylic sheet. Move it down to leave a space about 3/4 or any size that appeals to you, and daub on color again. Continue with this process until you have filled in the entire half. Place the clear sheet back in the center, daub the color on repeating all the way to the edge. Next retape the daubed piece so that you can now make a strip going across the ones you have just laid down. When you have finished this side you may need to add some color around the edges to give it a completed look. Do not worry that your stripes are not perfectly spaced! You will add something on the top and you will be amazed as you look at it how it becomes a pillow top look. I colored my butterflies with copics and added them to my base with pop dots to give them some lift! You can have such a great time with this technique and I sure would love to share your designs so send me a picture! Thanks debsegler@gmail.com or 979-255-0337. P<S> This technique is on Youtube,
 Tuesday, May 20, 2014
You Are My Sunshine

HAPPY BIRTHDAY TO YOU!!

Tuesday, May 13, 2014
PAINT BALL TECHNIQUE! LOL!

Monday, May 5, 2014
'PUT THE PETAL TO THE METAL' Metal sheets that is!

Have questions email me at debsegler@gmail.com
Wednesday, April 30, 2014
Steampunk Lady from my retreat

Grass with new scissors ORDER YOURS NOW!

Quick and Easy Yet Very Cool!
 This look is so easy and you can give any card a different look by cutting your white card stock into three or more strips. Be creative and make them different sizes and shapes! Stamp the image and color it before you cut your shapes, then you leave a small space between them when you put them on the background color. I like to use a pop dot to give the look some lift off the page!
 Wednesday, April 9, 2014
Pop Up Die Cut Card

SPRING THING!
 I really like this zentangle type of look on a card! This is several stamps cut out and put together. I used pop dots to give the pieces dimension and layers. I hear you saying, I do not have any stamps like that! Well, again all you need is a couple of stamps with open space in the designs. Then you can stamp inside to give it a new design element, or doodle in your own designs! This type of art really brings out the artist in me, I like to use what I have to make something new and different. Use a leaf stamp and add in your own squiggly line, or stamp with a paisley stamp, or even small hearts. I have you thinking now right? Please send me a picture of your new designs and remember I always send you a great surprise back! Have some SPRING FUN!
BACK IN THE SADDLE AGAIN!!!!! Free PRIZES!!!
Hello to all of my stamper friends! I am back in the saddle of stamping again. I have had a long break due to my hip replacement surgery. I am doing well and still recovering! And to get back in the swing I am posting several cards today, and a new contest! To help you get motivated, and get me some new cards to copy I am giving away a great package of stamps, card stock, bling and markers! All new and ready for you to make some new spring things! What you need to do is mail me via snail mail Debbie Segler 14916 Riverside Drive Little Elm, Texas 75068, three finished cards that I can use to make some new things from! That is easy enough right! Your cards need to be mailed to me and received by April 28th. I will pick the winner on that day and be sure to include your snail mail address so I can mail your prize if your the winner! This card is one of my new stamps from the last stamp show I attended in Plano, Texas. I love windows and the stained glass really is fun to color. We used copic and stampin- up markers to color this project. I have a sneaky way for you to make stained glass look if you do not have a stamp. I still can't get upstairs to my craft studio, but when I can I will use several small individual stamps to make my own stained glass design. You stamp three in a row to form a window shape like this card has, and then overlay a window die cut to give yours the window shape. I know you all have some little stamps that you can group together to design your windows! Please email me a picture of your designed stained glass window cards!~ debsegler@gmail.com

Wednesday, January 22, 2014
Just Because!
 This just because turned out simple but elegant! The border flowers are from a new punch. The little scalloped flowers
are a peel and stick border from a kit from stamin up. Please remember if you want to order give me a shout! debsegler@gmail.com. Just because was a stamp and the card it is stamped on has little flowers and leaves to frame in the words. I loved the colors and they all came together for a Spring Time feeling to this card.
Love is In the Air!
 This is the season for Love so get your creativity going by making a love card! The front is designer paper with some yellow twine placed around holding a stamped and punched heart. The red word love gives the card a focal point and some real pop of color. Then the button and bling was the finishing touch. The inside of the card is covered with coordinating designer paper and there is a large heart punched out of the center giving you a place to write, (sorry no picture) I think it it LOVELY!
 Prom Night! !
 This card was so much fun to make! Stamp friend Betty came through again and printed these for me. You cut the items out and then add pop dots to give the pieces dimension. The rose and the girls dress have about four layers and really look beautiful in person. Youc an use the technique with your stamps. You just stamp five images one for your base to glue to and four to add on the top! This is your assignment if you accept it! Get inspired and get to stamping! I would love to see your projects too! debsegler@gmail.com
 Key to my Heart!
 I was stamping with my friends and we had been seeing Valentines cards on blogs so we jumped in and made this one. The stamped heart was Bettys stamp and
I really liked the textured look it gave the card. We layered the card stock behind the heart and added the cute little doily for a lacy trim. The border is wasi tape jut love that stuff! he red key was punch out from a kit but you can even stamp a key if you wanted to.
Wednesday, January 15, 2014
Better Than Therapy!
 Hello friends! I have been off the blogging trail for a while. I have a ruptured disk in my back and will have surgery soon. I have been playing some but mostly just trying to make it till my surgery. Here are 3 fun cards to get you back in the swing of stamping too! The butterfly card is a design from my friend Lorna she had this all embossed and punched for us to make and I just love the colors and design. The card stock is embossed with embossing folders and cut into strips about one inch thick, then a punched butter fly is added at the end with a few pearls to form the body of the butterfly. This punch is a stampin up punch and I will be happy to order all of these supplies for you just let me know. debsegler@gmail.com or 979-255-0377
  This pretty girl was a copics colored card from my friend Debbie, she colored it and I designed the card. She is a little blurry in my photo sorry but in person she is clear and beautiful! The thinking of you is a stamping up stamp set and has a cute flower, coffee cup, and some sentiments in the set. It pairs with the checked roller and WOW is it cute together! So, add this to your order too!
  Thanks to my friend Betty this flower card is a stamp up stamp with a variety of sentiments, you will love it! We stamped the flower three times cut it apart and layered it with pop dots! It has bling in the center colored with sharpie markers to give it that extra punch! So, be inspired and feel free, to copy!
Subscribe to:
Posts (Atom)
Embossing folder Background
The embossing folder gives the background depth and textures and a special focal point. I love sunflowers year round! Hope you’re smiling an...

-
 Betty Justilian Schaub Zack's Nana's Creative Imagination Guest Designer Howdy! Debbie Segler and I met in October 2008....
 -
 It’s been a while since I have posted. I have had some health issues and life got in the way. But I am back and designing cards again. Pl...
 -
 I found this sweet picture of my little girls at Christmas and just had to share the wonderful little blessings in my life! They have al...