
Sunday, December 8, 2013
Scene Cut Out
Let It Snow ... SNOWMAN
 This card was my stamp friend Lorna's design she made for us, and it is just a blast to make and very easy. I stamped with white craft ink on the red card stock the snowflakes. We used a large circle punch for his head and cut a orange nose free hand. His eyes are black dots and his scarf is staminup ribbon. We added bling to the snowflakes centers and glued onto a navy card base. I think this is a great card for guys too!
 No Botox Needed
This little bird is telling me to get my act together for Christmas! We are iced in and I have gotten my tree decorated and working on the cards to mail out! This bird has been printed twice and cut out and the pine cone and birds hat have pop dots under them for a 3-d look. I like the bright colors and hope you do too! Pick a card you want to make and stamp it twice so you can give your card a uplift with no botox! 

Sunday, November 24, 2013
Decorating for Christmas!

Christmas Bird with envelope
 This beautiful bird card was part of a stampin up kit that was such a fun set to make! As I listen to the sleet on the windows this morning I am in the mood to snuggle into my craft room and create more fun cards. I am giving them as pre Christmas gifs this year, a set of cards and a nice colored pen to my sweet friends! The tag is the main focal point and the bird and sentiment looks very pretty as the accent on this card. Our new catty has the best tag punch ever in it so you get that perfect tag top every time! You can order from it in January! The bakers twine and little button gives the special top to the tag!
 Friday, November 15, 2013
SANTA IS COOL!
 I just love anything with Santa on it and these cards are getting me in the Holiday Spirit! The circle is a die cut (spellbinders I think) and the designer paper is stampinup from last year. I love the Santa postage stamp, I just cut it out of designer paper, and then put it on with pop dots. The Santa card below I made at Bettys and the Santa is a chip board cut out, we iced the tag and the Santa with brown ink to give a vintage look to the project. The deck the halls sentiment and the music paper really brought the design all together. The bling and bow added the extra touch to the finished card.
ELF HOLLY JOLLY MAGIC!

Tuesday, November 5, 2013


Friday, November 1, 2013
HAPPY BIRTHDAY TO ME SEND A CARD PROJECT TO ME!!
Yes today is my Birthday and I want to have you all send me some card projects to make or copy! I have some back problems right now so having to sit and stay in. My snail mail is Debbie Segler 14916 Riverside Drive Little Elm, Texas 75068 Or you can email me at debsegler@gmail.com I would love some digitals to print and color too! Thanks Debbie
 This noel card was made with my bag of goodies from last year and some new things added. That is your assignment for the week. Dig out your Christmas goodies from last year cause I know your like me and you have small plastic bags of things you cut out, and stamped but did not use last year. The ribbon was made with my stamp friends Betty and Lorna. It took me an hour to braid this little piece! HA! So, I saved it and here it is on this card and it add just the SNAP! I colored the Cardinal with colored pencils and my stampin up blender pen! I use my blender pen all the time and it gives my project a finished smooth water color feel! So email or call me to put in your order now! Thanks Debbie 979-255-0377 debsegler@gmail.com
 This noel card was made with my bag of goodies from last year and some new things added. That is your assignment for the week. Dig out your Christmas goodies from last year cause I know your like me and you have small plastic bags of things you cut out, and stamped but did not use last year. The ribbon was made with my stamp friends Betty and Lorna. It took me an hour to braid this little piece! HA! So, I saved it and here it is on this card and it add just the SNAP! I colored the Cardinal with colored pencils and my stampin up blender pen! I use my blender pen all the time and it gives my project a finished smooth water color feel! So email or call me to put in your order now! Thanks Debbie 979-255-0377 debsegler@gmail.com
 Tuesday, October 29, 2013
Stampin' Up!
| ||||||||||||

Oct 29Weekly Deals!
from STAMPIN' UP BLOG


When you're ready just e-mail me and I'll tell you how to get yours!
Debbie Segler
Indenpendent Stampin' Up! Demonstrator
Monday, October 21, 2013
Swing in the Tree!

Saturday, October 19, 2013
SPECIAL ANNOUNCEMENT
Special Announcement!
Last 3 days to take advantage of the best Stampin’ Up! deal in Stampin’ Up’s history.
You can Join Stampin’ Up! right now for the extremely low price of $25.

During this offer, only the special $25 starter kit will be available;
the
regular $99 starter kit will not be available. The $25 Starter Kit
includes
regular $99 starter kit will not be available. The $25 Starter Kit
includes
- $26.95 worth of Stampin’ Up! product (it must be more than $25, but not more than $26.95 before tax)
- Business pack which includes
- A box of annual catalogs
- A package of the current seasonal catalog
- Getting Started DVD
- Starter Kit Business Brick
- Customer postcards
STAMPIN’ UP! DEMONSTRATOR BENEFITS:
- Receive 30% off your first product order of $150 or more (or keep it as “instant income” from sales). Redeem in the first 45 days.
- Get 20% off Stampin’ Up! products or keep as “instant income.”
- Pre-order new products before the customers sales period. One of my favorite perks
- Earn free hostess sets and merchandise faster because of your discount.
- Receive Stampin’ Up!’s demonstrator magazine, Stampin’ Success.
- Be inspired by video tutorials and project ideas on the Stampin’ Up! demonstrator web site.
- Earn free stamps with Stampin’ Start, Sale-A-Bration and other promotions.
- Qualify for cash bonuses, product bonuses, incentive trips and other awards.
- Earn additional income (called a volume rebate) based on your monthly product sales.
- Encourage others to join your group (recruit) and receive additional compensation.
- Enjoy 2 free months of a personalized Stampin’ Up! on-line store and blog (optional $12.95/mo. after trial).
- Plus you will receive all of my tutorials for free for being part of my team.
Here is an easy link for when you are ready to join Stampin’ Up! and my
team. It is simple and all online.
Contact me at Deb Segler or Call Me 979-255-0377 with any questions you may
have. You don't have to live in my area to join my team.
Friday, October 18, 2013
Octagon Flowers
This card is very pleasing to the eye, because of the black checked designer paper. I used the stampin up octagon punch and then layered white card stock behind the black checked. I fit the pieces together to form a shape across the face of the card. I embossed the flowers with clear embossing powder and then cut them out , the first flower looks a little yellow in the center and that was just a sweet accident as the stamp had some yellow on it and it gave the flower a very nice center. The pearls were added to the center of the flower and the sentiment placed on the top completed the look. 

Partridge In A Pear Tree

Wednesday, October 16, 2013
WITCH SHOES TO BUY?

Tuesday, October 15, 2013
Wreath for Holidays

Tuesday, October 8, 2013
OWL ARE YOU?

Monday, October 7, 2013
Embossed Pink Flower

Sunday, October 6, 2013
Pumpkin Patch

Wednesday, October 2, 2013
Window box flowers

a FREE surprise! Debbie Segler 14916 Riverside Drive Little Elm, Texas 75068 have fun!
Monday, September 30, 2013
These Boots Were Made for ....

My son Tres and his sweet wife Katherine, and my first one year old grand daughter were here and we had such a happy and fun time! She has just started walking! She had her new shoes on and ran and danced and clapped her hands all weekend! It was just a blast to have them here with us! We all went to Church together "BLESSED" and had a wonderful time at lunch. I am BOOSTED UP !!! This card is one my friend Ann made. I sure loved the colors and cute card. She use a Stampin' Up! die cut for the dress. The boots are in a very cute set Bootiful Occasions # 131967, with several seasonal shoes. Let me know if you want to order this set! 979-255-0377 debsegler@gmail.com
Friday, September 20, 2013
Blessed By all For Fall!

Wednesday, September 18, 2013
Batty stamp friends!
This card was part of a fun day with Betty and Lorna . We made several pretty projects and I will post them when I complete them but this one was so quick and easy that I got it finished! I had purchased the stickers at my retreat and Betty and I put them with some cute spiderweb background paper she had and we just added the stickers on top. I am sure ready for some cool weather to go along with the fall feeling of Halloween! Get out your fall stamps and papers and design a card, 

Monday, September 16, 2013
HEAVEN KNOWS YOUR SPECIAL! at Hots Retreat at Rocking R
I was so lucky to have attended a retreat this weekend and had such a wonderful time. My friend Freddie Heuss, invited me and we could not have enjoyed a better time together. She is very talented and we share our supplies, designs, food and laughter! When I arrived a new friend Tersa Nickleson, helped me to unload my car. Then another new friend Tina Jennings loaded all of my bags in my car for me to go home! My arthritis was giving me fits so these sweet ladies all helped me to be able to relax and enjoy the weekend! Thanks to you all, for blessing me with your acts of kindness! This is my butterfly card that I made at the retreat! The picture is a little light but the card really fits all of these
"SPECIAL LADIES" !!!
I colored this card with my copics and add it onto an embossed backing paper. The sentiment was a hand cut banner. This group has retreats and donates the money they make to charities! I will let you know about the next one so you can join us!

"SPECIAL LADIES" !!!
I colored this card with my copics and add it onto an embossed backing paper. The sentiment was a hand cut banner. This group has retreats and donates the money they make to charities! I will let you know about the next one so you can join us!

Rocking R Retreat Bird Card
Hello stamp friends! I have not posted in a while just been doing my thing. This watering can stamp is so pretty and I have really enjoyed coloring it with my copic markers. I first embossed the white card stock background, with a dry embossing folder, that I had added color straight from my stamp pad to the folder. The raised side of the folder. Then I ran it through the big shot to emboss. The ink grabs onto the design and gives a pretty shade to the design. Try lots of colors and even use several colors on one folder! It can change the whole look of your project. And for you scrapbookers this is a wonderful background to place a photo over on your pages. I promised my scrapbooker friends that I would try to give them more scrapbook tips so that is the one for this post! I colored the can and birds then fussy cut it out before adding it onto the background. Hope it inspires you to try a new technique! Remember if you mail me a card sample I will send you a sweet surprise in the mail, and post your card to my blog! Debbie Segler 14916 Riverside Drive Little Elm, Texas 75068 

Sunday, September 1, 2013
Butterflies
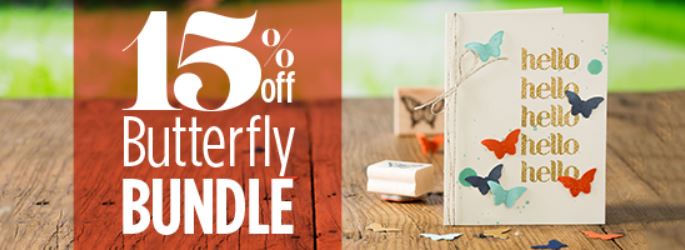
Stampin’ Up! has a new bundle special!
Dates: August 29 -September 30, 2013
Offer: Save 15% when you buy the Papillion Potpourri stamp set (available in both wood-mount and clear-mount) and the Bitty Butterfly Punch as a “bundle”!
Butterfly Clear-Mount Bundle
Item #135311 /$30.90 (preferred price)
Butterfly Wood-Mount Bundle
Item # 135312 / $34.90 (preferred price)
SHOP ME! www.debsegler.stampinup.net
I LOVE butterflies. How about you? Thank you for stopping by. How’s that Wish List looking? 
Stamp On My Friends!
Debbie Segler
Stamp On My Friends!
Debbie Segler
Tuesday, August 13, 2013
White Embossed Lacy Doily

Monday, August 5, 2013
Window Card Winner! Betty!!

Listen and you can hear the flutter of wings!

This card was colored with copic markers. I free hand cut the bird and flowers out and glued them on my card. I used a border punch on the edge of the designer paper on the inside of the card. (hard to see) I glued a small strip of paper that was left from my punch, cause I just could not throw it away! Your challenge today if you should take it is to make a card based on a happy memory! Send me a picture!
Tuesday, July 23, 2013
Black Magic Painting
Do you love to paint? I sure do and this technique is so fun on black card stock. I enjoy the relaxed feeling I get from painting. This is a water based pearl paint and it comes in beautiful colors. The more detail the more fun to paint. First you emboss with gold the stamped design, then you paint with the pearl paint. You can stamp on different colors but the darker the card stock the more your design will pop with color! Have fun!

I See You!
 This card was a quick and easy card to make and the colored washi tape is a blast to design with. I made this card at a play day with Betty my stamp buddy! We always have fun and seem to run out of time to stamp. Try to use at least three different tapes and make your design on your card front. I also put some tape on the inside to give it some color.
 Thursday, July 11, 2013
SUMMER CARD SWAP SEND ME A WINDOW CARD AND I WILL SEND YOU ONE BACK!
LETS HAVE SOME SUMMER SWAP FUN! This is one of my favorite new card types to make, the window card! 
I embossed the background and stained with a ink pad before I embossed it. The red bird added just the right touch with a little greenery. The bird was a sticker on a pop dot. Design your own window and send me a card of what you make. Debbie Segler 14916 Riverside Drive Little Elm, Texas 75068. The winner will receive a window card from me and a free stamp set with goodie bag! Email me with any questions debsegler@gmail.com.

Smell the Roses!

Subscribe to:
Posts (Atom)
Embossing folder Background
The embossing folder gives the background depth and textures and a special focal point. I love sunflowers year round! Hope you’re smiling an...

-
 Betty Justilian Schaub Zack's Nana's Creative Imagination Guest Designer Howdy! Debbie Segler and I met in October 2008....
 -
 It’s been a while since I have posted. I have had some health issues and life got in the way. But I am back and designing cards again. Pl...
 -
 I found this sweet picture of my little girls at Christmas and just had to share the wonderful little blessings in my life! They have al...